

Stavebnice je vyrobena dnes již tradičně technikou laser cut. Kromě dílů z kartonu různých tlouštěk obsahuje samozřejmě i díly pro zasklení oken. Jak je u Igra model tradicí, stavebnice dodává už v barevném provedení, nalakované. To pro mě bývá trochu kámen úrazu, protože rád používám vodou ředitelné barvy, případně pastely a to na lakovaném povrchu uplatnit nelze. Proto jsem díky vstřícnosti zástupců firmy dostal stavebnici ještě nelakovanou a mohu si s barevností experimentovat po svém.
Prvním krokem tedy je nabarvení potřebných ploch před jejich lepením, jak doporučuje i návod výrobce. Ten zmiňuje přetření nadpraží (překladů) oken a dveří šedou barvou. To udělám i já, poté, co si "obarvím" režné cihlové povrchy několika odstíny klasických pastelek.
The kit is made using the laser-cut technique. In addition to cardboard parts of various thicknesses, it also contains parts for window glazing. As is the tradition with the Igra model, the kit is already supplied in a color version, varnished. This is a bit of a disadvantage for me, because I like to use water-based paints or pastels, and this cannot be applied on a varnished surface. That's why, thanks to the helpfulness of the company's representatives, I got the kit unpainted and I can experiment with the colors in my own way.
The first step is to color the surfaces of the parts before gluing them, as recommended by the manufacturer's instructions. He mentions overcoating the lintels of windows and doors with gray paint. I will do the same, after I "paint" the terracota brick surfaces with several shades of classic crayons.

Na pastelky se nesmí tlačit - reliéf drobounkých cihel se snadno poruší, zejména na okrajích. Tady je výhoda lakovaného povrchu, který také stabilizuje povrchovou vrstvu a působí jako pojivo. Pokud ale máme možnost si povrch barevně pojednat sami, má to zas jiné výhody. Lakovaný povrch s uniformní barevností přece jen často působí maličko uměle.
S pastelkami dosáhneme rovnoměrného pokrytí pigmenty, ale přece jen se vyhneme úplně dokonalé stejnobarevnosti. Výsledek pak, alespoň v mých očích, imituje lépe realitu.
Crayons must not be pressed during colloring - the relief of tiny bricks is easily broken, especially at the edges. Here is the advantage of a lacquered surface, as the varnish also stabilizes the surface layer and acts as a binder. But if we have the opportunity to treat the surface color ourselves, it has other advantages. After all, a lacquered surface with a uniform color often looks a little artificial.
With crayons, we achieve an even coverage of pigments, but we still avoid complete uniformity. The result, at least in my eyes, imitates reality better.

Pokud máme chuť, je možné výsledek ještě o něco "doladit" akvarelovými barvami, které je ale nutné nanášet opatrně, s co nejnižším podílem vody.
If you feel like it, it is possible to "fine-tune" the result a little bit with watercolor paints, which must be applied carefully, with as little water as possible.

Výsledná barevnost stěn pak vypadá takhle. Nechám se překvapit jak bude barevnost působit na hotovém sestaveném modelu.
Pro jistotu jsem před vyřezáváním dílů stěn z rámu archu kartonu přestříkal celou plochu výtvarnickým fixativem, aby při další práci s obarvenými díly nedocházelo k velkým otěrům.
Další fází stavby jsou výplně otvorů - okna a dveře. Obvykle si sestavíme celou sadu najednou a pak ji do všech otvorů vlepíme.
Stavebnice má všechny díly tradičně kvalitně pojednané a i s těmito malými díly je příjemná přesná práce.
The resulting color of the walls then looks like this. I will wait to see how the color will work on the finished assembled model.
To be secure, before cutting the parts of the walls from the frame of the cardboard sheet, I sprayed the entire surface with an artistic fixative so that no abrasions would occur during further work with the painted parts.
The next phase of construction is the filling of openings - windows and doors. Usually we assemble the whole set at once and then glue all the windows and doors in their places.
The kit has all the parts made with traditional precision, so even with these small parts, the work is pleasant.

Mně se osvědčilo rám okna či dveří spolu s dílem zasklení sevřít do svorky (stačí obyčejný kolíček na prádlo) a obvod potřít dispersním lepidlem. Po dostatečném zaschnutí a při opatrné manipulaci už pak díly drží pohromadě a dají se přilepit na díl stěny, kam je třeba, opět dispersním lepidlem.
It works for me to clamp the window or door frame together with the glazing part in a clamp (just an ordinary clothes peg) and coat the perimeter with dispersion (PVA) glue. After sufficient drying and careful handling, the parts stick together and can be glued to the wall part where needed, again with PVA glue.


Kompletní sestava výplní otvorů - osm okenních dílů a tři díly dveří a vrat.
Complete set - eight windows and three entrance and garage doors.

A finální vzhled jednotlivých stěn po doplnění oken a dveří - vše je tedy připraveno k sestavení.
Do základové desky podle návodu postupně přilepíme dvě obvodové stěny, tvořící jeden z rohů domku a pak vnitřní příčky. Osvědčilo se mi postupovat směrem od jedné stěny ven do prostoru. Je dobré buď příčky vyřezávat z kartonu až v momentu lepení, nebo si je předem označit čísly podle plánu dílů, protože pak už nemusíme být schopni rozlišit která příčka patří kam.
The final appearance of the individual walls after adding windows and doors - everything is ready to assemble.
According to the instructions, we glue two perimeter walls to the base plate first, forming one of the corners of the house and then the inner wallns. It worked for me to move from one outer wall inwards. It is good either to cut the parts from the cardboard right before gluing, or to mark them with numbers in advance according to the plan of parts, because then we may no longer be able to distinguish which part belongs where.


Také lepení jednotlivých příček je dobré dělat pozorně - délky hran, lepených k podlaze, jsou na každém konci jinak dlouhé a proto je dobré si to případně před aplikováním lepidla vyzkoušet.
It is also good to glue the individual partitions carefully - the lengths of the edges glued to the floor are different at each end and therefore it is good to try it before applying the glue.


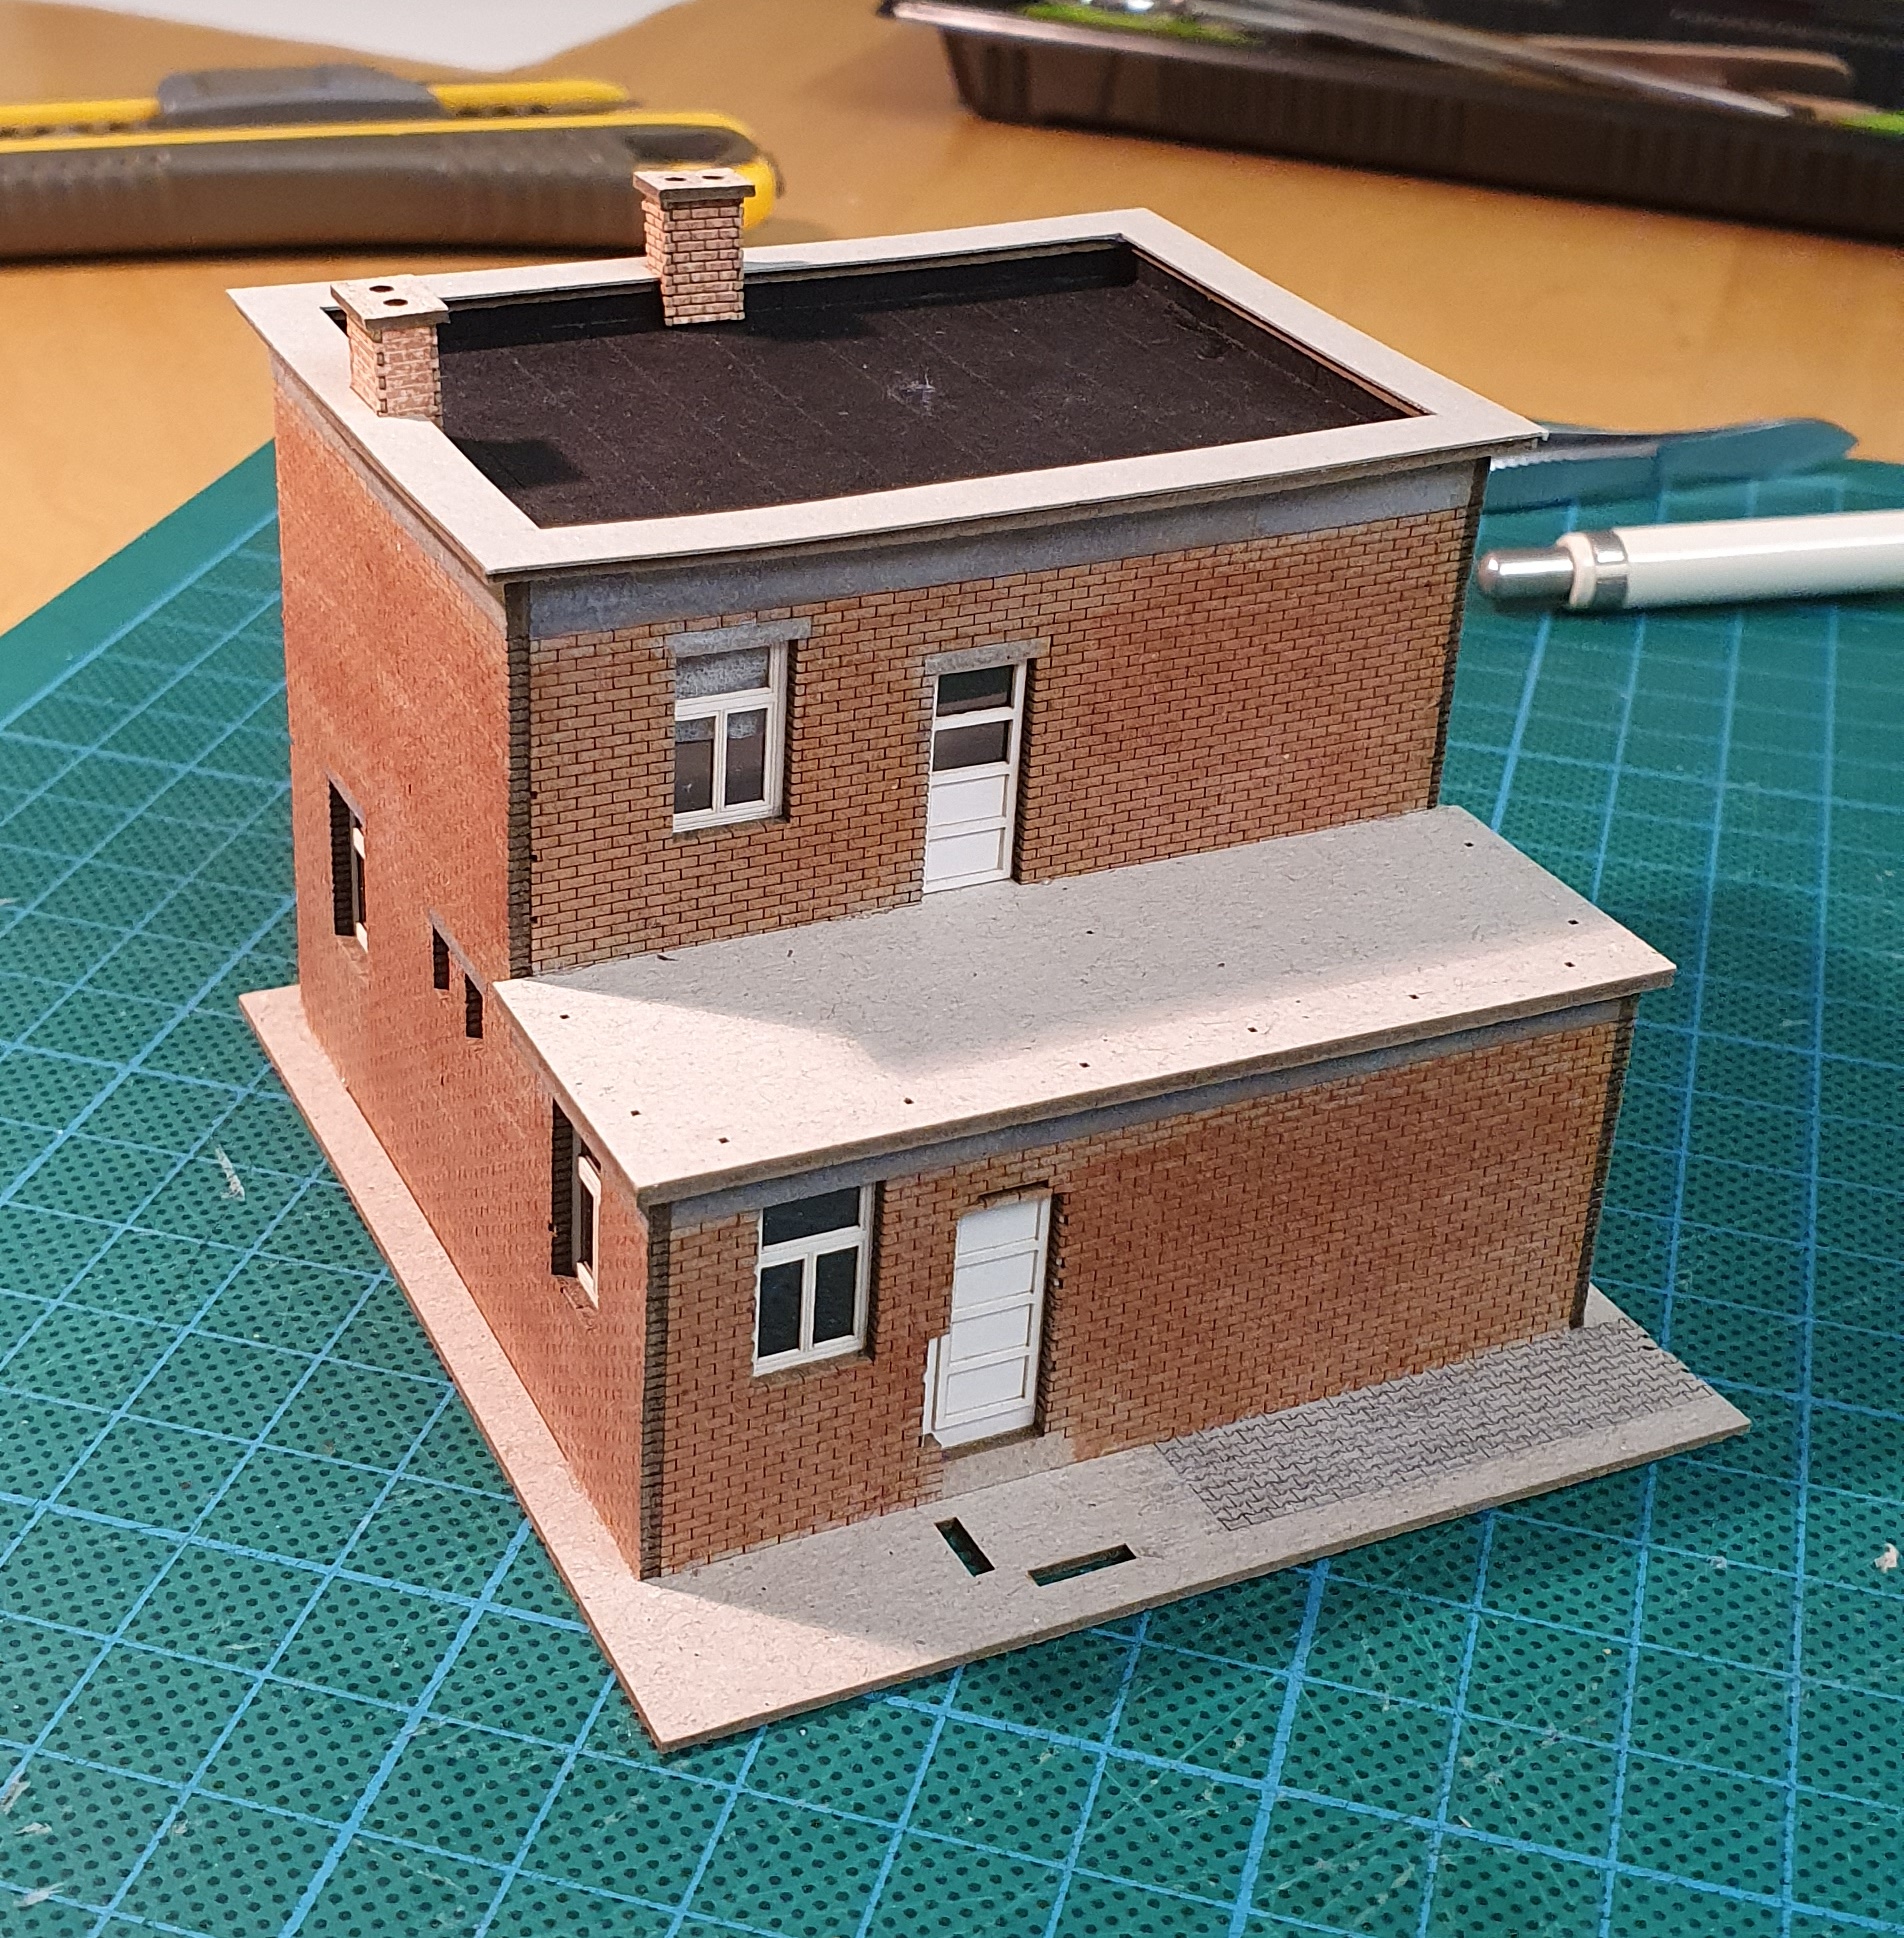
Sestavení celé stavby není komplikované, jen je třeba pozorně sledovat polohu každého dílu v návodu, aby nedošlo k jeho nesprávnému přilepení. To platí například o desce podlahy prvního patra, na kterou se pak zase lepí příčky v prvním patře. Stavbu stěn pak uzavírá horní obvodová stěna přiléhající k terase nad garáží. Tou je stavba stěn ukončena a zbývá střecha.
The assembly of the whole structure is not complicated, nevertheless it is recommended to carefully monitor the position of each part and consult the instructions to avoid inaccuracy. This applies, for example, to the floor slab of the first floor, to which the partitions on the first floor are glued again. The construction of the walls is then closed by the upper perimeter wall adjacent to the terrace above the garage. This completes the construction of the walls and we can start construction of the roof.


Určitou záludností u lepení střechy je hned přilepení stropní desky prvního patra, tedy základní konstrukční části střechy. Je ve většině své plochy podepřena příčkami, ale v rozích, zejména v rohu největší místnosti v patře, není její výšková úroveň při lepení ukotvena. Při příštím sestavování bych si uřízl hranolek rovnající se výškou výšce příček. Ten bych vlepil dovnitř rohu největší místnosti, aby mi podepřel roh stropní desky. Ty by pak nemohla při lepení sjet níže, než je žádoucí. Pokud se to totiž stane, nedá se vlastně nikudy zvednout zpět. Je tedy zřejmě záměrem tvůrců stavebnice aby byl na díl stropní desky nejprve nalepen díl představující krytinu, tedy asfaltovou lepenku, a teprve potom celek lepit na jehon místo v rámci stavby domku. Vzhůru ohnuté okraje vytažené lepenky pak určují úroveň zapuštění střechy do atiky.
It could be a mistake gluing the ceiling slab of the first floor immediately, ie the basic structural part of the roof. It is supported in most of its area by partitions, but in the corners, especially in the corner of the largest room on the upper floor, its height level is not anchored during gluing. The next time I would assemble, I would cut an upright equal to the height of the partitions. I would glue it inside the corner of the largest room to support the corner of the ceiling tile. This would prevent the roof from sinking lower than desired during the gluing. If that misshap happens, you can't actually correct it through anywhere. It therefore is probably the intention of the creators of the kit that the part representing the roofing, ie asphalt cardboard, is first glued to the part of the ceiling board, and only then to glue the whole structure to its site. The upward bent edges of the tar roofing then determine the level of embedding of the roof inside the attic walls.


Po přilepení střechy osadíme slepená komínová tělesa. Komínová tělesa jsem si uvnitř vyztužil kousky odřezků lepenek o potřebné tloušťce (3mm), ale myslím, že by držela dostatečně i bez této výztuže. Na místo jsem je lepil až po přilepení atikového plechu a dopadlo to dobře. Jako poslední jsem lepil pásky černé "lepenky", které představují krytinovou lepenku vytaženou na stěny komína a zároveň přikryjí připadně nedoléhající stěny komína k ploše střechy.
Once the roof is in place, we install glued chimneys. I reinforced the chimney stacks with pieces of cardboard scraps of the required thickness (3 mm), though it would probably be solid enough even without this reinforcement. I glued them in place only after gluing the attic wall top plate and it turned out well. Lastly, I glued strips of black "tar roofing", which represent roofing cardboard pulled up on the walls of the chimney stacks and at the same time cover any non-adjacent walls of the chimney to the roof surface.


Dalším krokem stavby pro mne bylo schodiště předložené před vstupními dveřmi. Tady jsem měl malé potíže. Jedna byla způsobená mou nepozorností a nedostatkem předvídavosti a druhá nepřesností dílu stavebnice. A co se tedy stalo? Slepil jsem si ze tří vrstev schodiště a přilepil ho na místo, kam hezky zapadlo, protože je ukotvené i částí dlažby zasahující až do světlosti otvoru vstupních dveří. Pak jsem přilepil kratší boční opěrnou obvodovou zídku, tvořící zároveň část zábradlí schodiště. A tady byl ten kámen úrazu - tu je vhodné přilepit jako první a teprve pak vlepit hmotu schodiště. V mém případě pak vyžadovalo určité násilí vtlačit díl do obou připravených otvorů v přiléhajících dílech (ve stěně vedle vstupních dveří a v díle podkladu). Naštěstí se to s určitou malou deformací podařilo. S druhým dílem obezdívky byl jiný problém: "klíč" - část dílu která se zapouští do dílu podkladové desky, byl delší než zámek - otvor v desce pro něj připravený. Musel jsem ho pak rychle zkrátit, než mi zaschne nanesené lepidlo. Ale i to se podařilo beze ztrát. :-) Tím je schodiště hotové.
The next step in the construction was the staircase in front of the entrance door. I had some troubles there. One was caused by my inattention and lack of foresight and the other by the inaccuracy of the kit parts. So what happened? I glued the stairs together (three layers) and glued it into the place where it fit nicely. It is anchored by a part of the paving reaching into the clearance of the entrance door opening. Then I glued a shorter side of the retaining perimeter wall, which also forms part of the stair railing. And here was the trouble - it is advisable to glue it first and only then glue the mass of the stairs. In my case, some violence was required while pushing the part into both prepared holes in the adjacent parts (in the wall next to the front door and in the base). Fortunately, it worked out with some minor damage. There was another problem with the second part of the walling: the "key" - the part of the longer perimeter wall that is inserted into the base plate, was longer than the lock - the hole in the plate prepared for it. I then had to shorten it quickly before the applied glue dried. Fortunately even that worked without loss. :-) This completes the staircase.


V tuto chvíli jsem nalepil všechny parapetní plechy v oknech domu. Šlo to překvapivě dobře (za pomoci malé pinzety a lupy se stojanem a s vlastním osvětlením). Dokonce i malé plechy do oken koupelny a WC se lepily bez problémů.
Většina dílů je na místě, zbývá už jen "kámen úrazu" - zábradlí terasy. To bude úkol sám pro sebe.
Zábradlí je nutné opatrně vyřezat z archu a opatrně v místech, kde budou nároží, ohnout do pravého úhlu. Teoreticky by myslím bylo nejlepší nejprve vlepit konce vodorovných „tyčí“ zábradlí do připravených otvorů ve fasádě domu a pak zábradlí usadit do podlahy terasy.
Vzhledem k tomu, že verze stavebnice, kterou jsem dostal, měla zábradlí o něco vyšší než bylo podle mého názoru vhodné, zkrátil jsem ho o vrchní vodorovnou úroveň a přilepil ho ke zbytku dílu tak, že tvoří střední linii ze tří. Tím se ale stalo obtížnější usadit konce vodorovných tyčí do otvorů ve fasádě a nakonec jsem byl nucen konce zábradlí zkrátit. To ale po úpravě dílu stavebnice nebude nutné a určitě se bude osazovat snáz.
At this moment, I glued all the window sill plates in the windows of the house. It went surprisingly well (with the help of small tweezers and a magnifying glass). Even small "metal sheets" in the windows of the bathroom and toilet were glued without problems.
Most of the parts are in place, all that remains is the "skills test" - the terrace railing. This will be a task of it's own.
The railing must be carefully cut from the sheet and carefully bent at right angles where the corners will be. Theoretically, I think it would be best to first glue the ends of the horizontal "bars" of the railing into the prepared holes in the facade of the house and then place the railing in the floor of the terrace.
Since the version of the kit I received had a railing slightly higher than I thought was appropriate, I shortened it (cut off the top horizontal level) and glued it to the rest of the part so that it forms the middle line of the three. However, this made it more difficult to fit the ends of the horizontal bars into the holes in the facade, and in the end I was forced to shorten the ends of the railing. All of this won't be necessary after the modification of the kit part by the manufacturer and will certainly be easier to install then.


Zbývá jen dolepit stříšku nad vchodové dveře a tím je stavba domku hotová. V mém případě dobře zapadá do koncepce kolejiště, které plánuji dobově zasadit do poloviny 30. let. Nechávám tedy stavbu vyhlížet jako nově postavenou. Snadno ale drobnými úpravami dosáhnete vzhledu stavby modernizované, rekonstruované či mírně zchátralé, podle toho jak se vám do kolejiště bude hodit. Mám radost, že máme na výběr další civilní stavbu, která je typicky tuzemská. Za to patří Igře dík!
All that remains is to glue the roof over the front door and thus the construction of the house is complete. In case of my layout, it fits well into the concept, which I plan to set in the mid-1930s. So I let the building look like it was newly built. However, you can easily achieve the appearance of a modernized, reconstructed or slightly dilapidated building with minor modifications, depending on how it will fit into your track. I am glad that we have a choice of another civilian building, which is typically domestic. Thanks to Igra for that!

Žádné komentáře:
Okomentovat